Thursday, May 24, 2012

Pinterest Sew Along

I am so excited to be part of Michelle's first ever Pinterest Challenge!  LOVE Pinterest and LOVE a {sewing} challenge!


The Challenge just happened to coincide with a Flickr Swap I was involved in so things worked out perfectly!


I just had to remember to take pictures of my project while sewing! Thank goodness for cell phone cameras!


So, a few weeks ago I signed up to be a part of a Pincushion Swap on Flickr.  I started perusing the Internet, Flickr, Pinterest, etc.  for something my swap partner would like.  


I spotted "Mr Turtle Pincushion/Sewing Kit" and thought he was darling! 
Now, I've never sewn a pincushion before and thought, "How hard can it be?"  And honestly it hasn't been TOO hard, just time consuming {cough::cough:: soooo time consuming!!}


Of course I chose a really detailed pincushion with lots of tiny parts and lots of hand sewing.  BUT...I think it turned out fantastic! 


I'm sad to see the little guy go.... I'll miss him. :)


I found the tutorial for him here and pinned it on my "Sewing Ideas to Try" board on Pinterest.  I liked the fact it was more than just a pincushion and had little hideaway spots for sewing goodies!


So, first off I have to tell you that I printed the pattern right away and started cutting out the fabric for the cute turtle pincushion.  


I used some bright, solid cotton for the hexagons and tan linen for the shell.  Mmmmmm...yummy!


I was going to use a print for his body parts {in picture} but went with a bright green solid instead.  He seems happy with it.


A little while later I saw that I was supposed to ENLARGE the pattern 200% for the Sewing Kit Turtle.  The regular size was for "Mr. Normal Size Turtle Pincushion Without Any Sewing Goodies". {oops}.

I decided I liked the smaller pattern size  BUT I cut the fabric about 3/8" bigger than the pattern piece to give me a nice seam allowance.  


{He turned out to be about 7" from head to tail when completed.  If you compare the original{small}pattern to my version you'll see I tweaked it a little to fit my liking/capabilities!}


Hexies. Hexagons. Polygons.


These bad boys are TINY and CUTE!  I've never made anything using hexagons but now I'm a P.R.O!  {No, not really.}  


But I do think that in the future I'll be a good hexi maker, especially if they are bigger than 1". O_o


Body:  
I used what I had on hand for his eyes - -5mm buttons.


I stuffed his flippers and head with stuffing from an IKEA pillow.  I remembered reading somewhere that the filling in their pillows is really awesome.  It worked perfectly. Nice, soft and fluffy! 


The front flippers have some beans in them to give them some weight and a magnet in them to pick up stray pins!


Outside Top Shell:  Has interfacing and batting inside.  Hexis are sewn to outside top and then top and bottom pieces are sewn together and turned right side out.


Topstitching was added.
I cut an elastic hairband in two and sewed one piece to each side of the top shell.  {If I make this pincushion again I think I'll sew the elastics into the seam while the shell is inside out so it looks a little cleaner.}


Bottom Shell:
Interfacing added to the bottom shell {as well as the body of the turtle}


Batting {After sewing the batting on to the bottom and top of the shell pieces, I cut away most of it to cut down on bulk.}


Topstitched bottom of shell.


I fussy cut a cute turtle from some fabric, made it into a hexagon and sewed it onto the bottom of the shell.  The hexagon has a magnet sewn inside it to help keep the scissors {see below} in place. 


Buttons are sewn to either side of the bottom shell and are used with elastics to hold shell on.


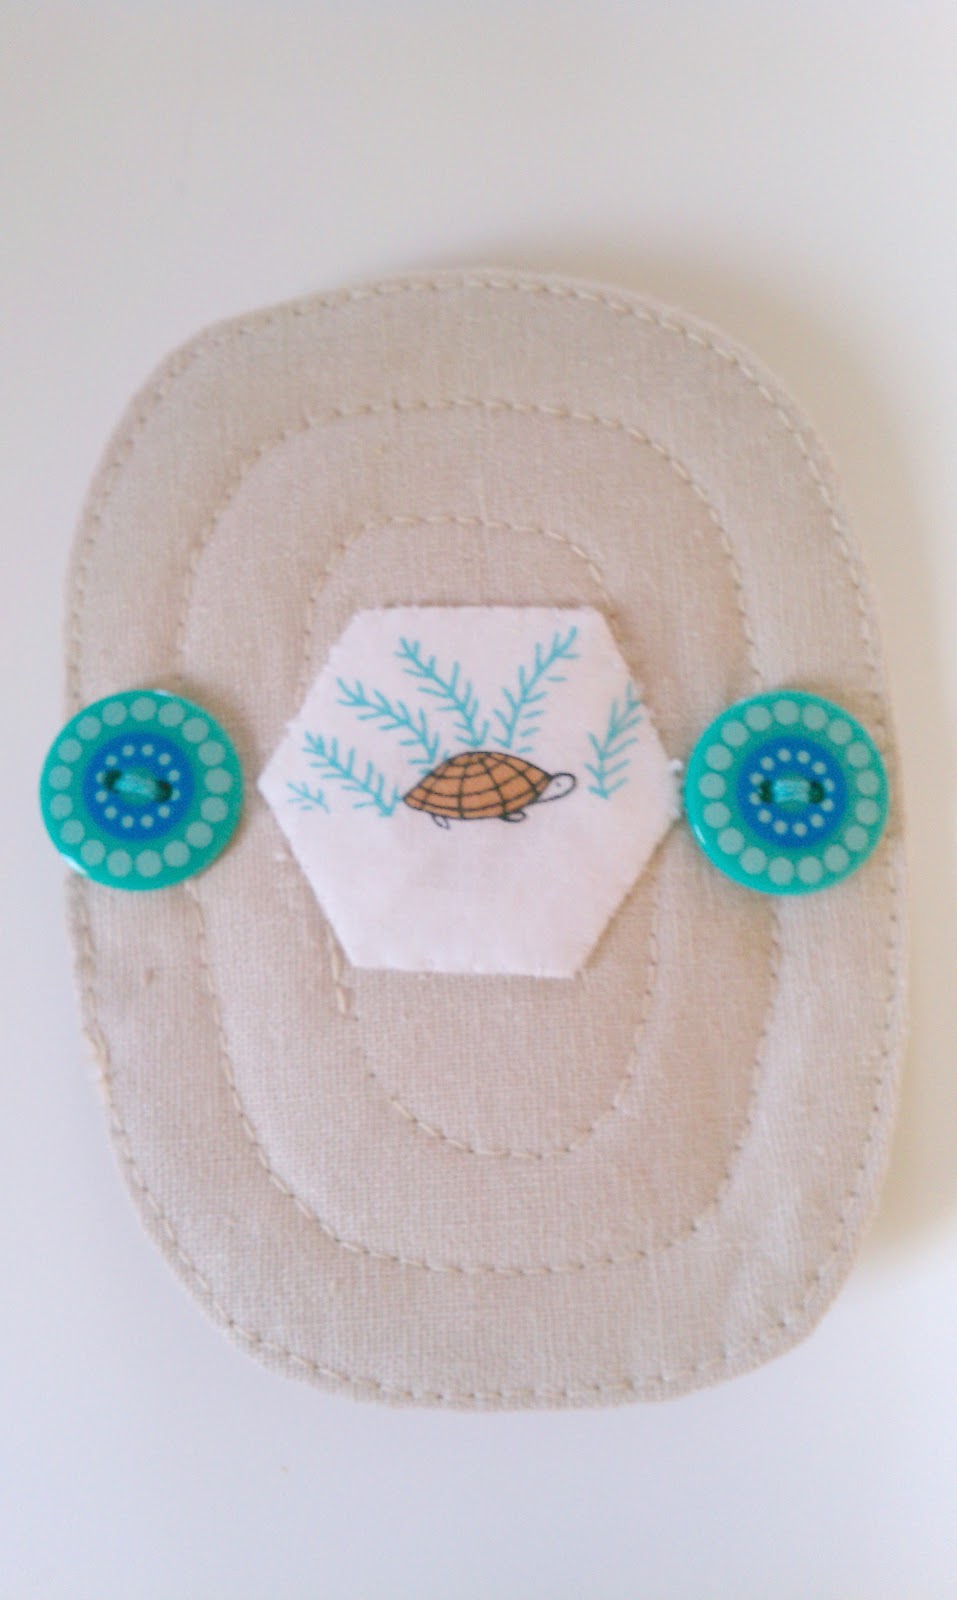
Inside Bottom Shell:  A little felt case to hold scissors in place.


Bottom of Turtle:  Felt book to hold pins/needles. 
An elastic band in sewn in the middle and attached to the bottom of the turtle's body.  Slip a spool of thread inside the two loops.


Annnnndddddd.....there you have it!   
A cute turtle pincushion/sewing kit!


Why don't you run on over to Michelle's blog and look at the other sewing projects included in the Pinterest Challenge?  


Tuesday, May 15, 2012

Rolodex Birthday Calendar

Rolodex Birthday Calendar


Awhile back I saw this cute tutorial on how to make a birthday calendar using a Rolodex. 


I pinned it on Pinterest and kept the thought tucked back in my mind for a future project.  


Fast forward several months....I just happened upon the clearance section at Jo-ann Fabrics and saw a Rolodex on clearance for $1.98.  SCORE!


There were a couple but I contained my self and only snagged one. {hehe}


So, the Rolodex sat in my 


"Office/Sewing Room/Craft Room" 

for quite awhile until this week when I remembered we had a wedding to attend on Saturday. {We've already gotten a gift from their registry but I thought this would be a cute addition.}


Out came the Rolodex and a stash of scrapbooking paper!  {This is the paper I used waaaaayyy back on this project}. 


Referencing Suzanne's tutorial, I whipped a Birthday Calendar up in no time!
I first created a Word document with the name of the months on it so I could punch them out with my circle punch.  


The font I used is called: 


{ Pea Smashtastic Doodles }

You can find it over at Kevin & Amanda


Then I used my little Xyron and made the white month circles into stickers and attached them to patterned scalloped circles.


Like Suzanne I punched two holes in the bottom of the cardstock divider and cut a wide slot for the paper to fit on the Rolodex track. 


I found that by only cutting a skinny slit my dividers didn't want to move very freely so I just made the slit wider. :)


I know we all use Facebook, cellphone calendars, online calendars etc. to remember birthdays, but I like to also have something physical my hands can touch and I can write in!  


And come on...... it's cute!


Monday, May 14, 2012

Busy Days of Spring

Wow.  Long time no see!  


Things have been a bit busy around here.  My daughter has been in a few dance competitions.  Her team did really well! So proud of her.  (She's on the bottom, right corner)

Supers Team in their "Fireball" outfits

Here's the song they danced to:
"Fireball" by Willow, Featuring Nicki Minaj


I've also done most of my flower planting for the season.  These zinnias have become my favorite!  They are called "Uproar Rose" and grow to be about 3 feet tall! 


Uproar Rose zinnia

A friend introduced them to me last year and I patiently wait until the local garden center has them in stock (usually the first week in May) and then run and buy a bunch!


Uproar Rose Zinnia


My husband (who is currently out of work O_o) has painted the family room AND bathroom for me!  The family room is this color:
Canyon Pebble by FreshAire
 and the bathroom is this color:

Terrarium by FreshAire
 I LOVE the family room color but not so much the bathroom color.  
Oh well.  It's what we had purchased awhile ago so it will have to do for now!  


He also painted all the wood fixtures and cabinets in the bathroom white!  I really like them.  We also got a new light fixture.


I pretend this is what the bathroom looks like....

BHG Bathroom

 ....but I still have some work to do on it!

I have done some sewing these past few weeks.  I'll have to post some pictures a little later!  Well, that's all I have for ya now!